Menu Horisontal

Tampilkan postingan dengan label SQL Server. Tampilkan semua postingan

Kamis, 09 Januari 2014

SQL Server: Calculating Running Totals, Subtotals and Grand Total Without a Cursor

By Gregory A. Larsen
Sumber : http://www.databasejournal.com/article.php/1560691

If you have ever had the need to show detailed data of individual transactions and also keep a running total, subtotals, and grand total columns at the same time, but were not exactly sure how to tackle the problem then this article might help. In this article I will show you a few different techniques for calculating and summing information on multiple rows without using a cursor. The techniques I will show you will just use a basic SELECT statement. Of course, the calculations of the running total, subtotals and grand total will be done using other SQL clauses and functions like SUM and CASE.

Sample Data Used by Examples

Prior to showing you my examples, I will first need to establish a set of test data, which all my examples will use. My test data will consist of an "Orders" table with the following format:
create table Orders
(OrderID int identity,
 OrderAmt Decimal(8,2),
 OrderDate SmallDatetime)
I've populated this test Orders table with the following set of records:
OrderID     OrderAmt   OrderDate                                              
----------- ---------- --------------------
1           10.50      2003-10-11 08:00:00
2           11.50      2003-10-11 10:00:00
3           1.25       2003-10-11 12:00:00
4           100.57     2003-10-12 09:00:00
5           19.99      2003-10-12 11:00:00
6           47.14      2003-10-13 10:00:00
7           10.08      2003-10-13 12:00:00
8           7.50       2003-10-13 19:00:00
9           9.50       2003-10-13 21:00:00
All my examples will be using this table to produce the running totals, sub totals, and grand total reports shown below. Basically this table contains a number of different orders that where created over time. Each order has an ID (OrderID) which uniquely identifies each record, an order amount (OrderAmt) that holds a decimal amount for the order, and a timestamp (OrderDate) that identifies when the order was placed.

Running Total On Each Record

This first example will display a simple method of calculating the running total of the OrderAmt. The calculated running total will be displayed along with each record in the Orders table. The "Running Total" column will be created with a simple SELECT statement and a correlated sub query. The correlated sub query is the part of the statement that does the heavy lifting to produce the running total.
select OrderId, OrderDate, O.OrderAmt
 ,(select sum(OrderAmt) from Orders 
                          where OrderID <= O.OrderID)
   'Running Total'
from Orders O
When I run this query against my Orders table I get the following results:
OrderId     OrderDate            OrderAmt   Running Total                            
----------- -------------------- ---------- ------------- 
1           2003-10-11 08:00:00  10.50      10.50
2           2003-10-11 10:00:00  11.50      22.00
3           2003-10-11 12:00:00  1.25       23.25
4           2003-10-12 09:00:00  100.57     123.82
5           2003-10-12 11:00:00  19.99      143.81
6           2003-10-13 10:00:00  47.14      190.95
7           2003-10-13 12:00:00  10.08      201.03
8           2003-10-13 19:00:00  7.50       208.53
9           2003-10-13 21:00:00  9.50       218.03
As you can see, there is a "Running Total" column that displays the running total along with the other column information associated with each Orders table record. This running total column is calculated, by summing up the OrderAmt for all Orders where the OrderID is less than or equal to the OrderID of the current ID being displayed.

Running Total for Each OrderDate

This example is similar to the one above, but I will calculate a running total for each record, but only if the OrderDate for the records are on the same date. Once the OrderDate is for a different day, then a new running total will be started and accumulated for the new day. Here is the code to accomplish this:
select O.OrderId,
    convert(char(10),O.OrderDate,101) as 'Order Date',
    O.OrderAmt, 
    (select sum(OrderAmt) from Orders 
                          where OrderID <= O.OrderID and 
                               convert(char(10),OrderDate,101)
                             = convert(char(10),O.OrderDate,101))
                                'Running Total' 
from Orders O
  order by OrderID
Here are the results returned from the query using my sample Orders Table:
OrderId     Order Date OrderAmt   Running Total                            
----------- ---------- ---------- ---------------
1           10/11/2003 10.50      10.50
2           10/11/2003 11.50      22.00
3           10/11/2003 1.25       23.25
4           10/12/2003 100.57     100.57
5           10/12/2003 19.99      120.56
6           10/13/2003 47.14      47.14
7           10/13/2003 10.08      57.22
8           10/13/2003 7.50       64.72
9           10/13/2003 9.50       74.22
Note that the "Running Total" starts out with a value of 10.50, and then becomes 22.00, and finally becomes 23.25 for OrderID 3, since all these records have the same OrderDate (10/11/2003). But when OrderID 4 is displayed the running total is reset, and the running total starts over again. This is because OrderID 4 has a different date for its OrderDate, then OrderID 1, 2, and 3. Calculating this running total for each unique date is once again accomplished by using a correlated sub query, although an extra WHERE condition is required, which identified that the OrderDate's on different records need to be the same day. This WHERE condition is accomplished by using the CONVERT function to truncate the OrderDate into a MM/DD/YYYY format.

Running Totals With Subtotals and Grand totals

In this example, I will calculate a single sub totals for all Orders that were created on the same day and a Grand Total for all Orders. This will be done using a CASE clause in the SELECT statement. Here is my example.
select O.OrderID,convert(char(10),O.OrderDate,101) 'Order Date',O.OrderAmt, 
       case when OrderID = (select top 1 OrderId from Orders 
                           where convert(char(10),OrderDate,101)
                              = convert(char(10),O.OrderDate,101)
                          order by OrderID desc)
            then (select cast(sum(OrderAmt) as char(10)) 
                     from Orders
                     where OrderID <= O.OrderID
                        and convert(char(10),OrderDate,101)
                           = convert(char(10),O.OrderDate,101))
            else ' ' end as 'Sub Total',
       case when OrderID = (select top 1 OrderId from Orders 
                           order by OrderDate desc)
            then (select cast(sum(OrderAmt) as char(10)) 
                      from Orders) 
             else ' ' end as 'Grand Total'
from Orders O
  order by OrderID
Output from the SELECT statement looks like this:
OrderID     Order Date OrderAmt   Sub Total  Grand Total 
----------- ---------- ---------- ---------- ----------- 
1           10/11/2003 10.50                           
2           10/11/2003 11.50                           
3           10/11/2003 1.25       23.25                
4           10/12/2003 100.57                          
5           10/12/2003 19.99      120.56               
6           10/13/2003 47.14                           
7           10/13/2003 10.08                           
8           10/13/2003 7.50                            
9           10/13/2003 9.50       74.22      218.03
In this example the first CASE statement controls the printing of the "Sub Total' column. As you can see, the sub total is printed only on the last order of the day, which is determined by using a correlated sub query. The second CASE statement prints the "Grand Total", which is only printed along with the very last order. Each of these CASE statements uses the TOP clause to determine which OrderID is the correct order for which to print out the "Grand Total".

Conclusion

Hopefully these examples will help you understand different methods that can be used to calculate running totals, sub totals, and a grand total. As you can see you don't need to use a cursor to calculate these different totals. With the creative use of correlated sub queries and other SELECT clauses like CASE you can easily create all these different totals. Next time you need to calculate totals consider using one of these non-cursor based solutions.

Sabtu, 07 September 2013

Efficiently Paging Through Large Amounts of Data (VB)

Sumber : http://www.asp.net/web-forms/tutorials/data-access/paging-and-sorting/efficiently-paging-through-large-amounts-of-data-vb


Introduction

As we discussed in the preceding tutorial, paging can be implemented in one of two ways:
  • Default Paging can be implemented by simply checking the Enable Paging option in the data Web control s smart tag; however, whenever viewing a page of data, the ObjectDataSource retrieves all of the records, even though only a subset of them are displayed in the page
  • Custom Paging improves the performance of default paging by retrieving only those records from the database that need to be displayed for the particular page of data requested by the user; however, custom paging involves a bit more effort to implement than default paging
Due to the ease of implementation just check a checkbox and you re done! default paging is an attractive option. Its na�ve approach in retrieving all of the records, though, makes it an implausible choice when paging through sufficiently large amounts of data or for sites with many concurrent users. In such circumstances, we must turn to custom paging in order to provide a responsive system.
The challenge of custom paging is being able to write a query that returns the precise set of records needed for a particular page of data. Fortunately, Microsoft SQL Server 2005 provides a new keyword for ranking results, which enables us to write a query that can efficiently retrieve the proper subset of records. In this tutorial we ll see how to use this new SQL Server 2005 keyword to implement custom paging in a GridView control. While the user interface for custom paging is identical to that for default paging, stepping from one page to the next using custom paging can be several orders of magnitude faster than default paging.
Note: The exact performance gain exhibited by custom paging depends on the total number of records being paged through and the load being placed on the database server. At the end of this tutorial we ll look at some rough metrics that showcase the benefits in performance obtained through custom paging.

Step 1: Understanding the Custom Paging Process

When paging through data, the precise records displayed in a page depend upon the page of data being requested and the number of records displayed per page. For example, imagine that we wanted to page through the 81 products, displaying 10 products per page. When viewing the first page, we d want products 1 through 10; when viewing the second page we d be interested in products 11 through 20, and so on.
There are three variables that dictate what records need to be retrieved and how the paging interface should be rendered:
  • Start Row Index the index of the first row in the page of data to display; this index can be calculated by multiplying the page index by the records to display per page and adding one. For example, when paging through records 10 at a time, for the first page (whose page index is 0), the Start Row Index is 0 * 10 + 1, or 1; for the second page (whose page index is 1), the Start Row Index is 1 * 10 + 1, or 11.
  • Maximum Rows the maximum number of records to display per page. This variable is referred to as maximum rows since for the last page there may be fewer records returned than the page size. For example, when paging through the 81 products 10 records per page, the ninth and final page will have just one record. No page, though, will show more records than the Maximum Rows value.
  • Total Record Count the total number of records being paged through. While this variable isn t needed to determine what records to retrieve for a given page, it does dictate the paging interface. For example, if there are 81 products being paged through, the paging interface knows to display nine page numbers in the paging UI.
With default paging, the Start Row Index is computed as the product of the page index and the page size plus one, whereas the Maximum Rows is simply the page size. Since default paging retrieves all of the records from the database when rendering any page of data, the index for each row is known, thereby making moving to Start Row Index row a trivial task. Moreover, the Total Record Count is readily available, as it s simply the number of records in the DataTable (or whatever object is being used to hold the database results).
Given the Start Row Index and Maximum Rows variables, a custom paging implementation must only return the precise subset of records starting at the Start Row Index and up to Maximum Rows number of records after that. Custom paging provides two challenges:
  • We must be able to efficiently associate a row index with each row in the entire data being paged through so that we can start returning records at the specified Start Row Index
  • We need to provide the total number of records being paged through
In the next two steps we ll examine the SQL script needed to respond to these two challenges. In addition to the SQL script, we ll also need to implement methods in the DAL and BLL.

Rabu, 01 Mei 2013

Mengenal Dasar SQL Server 2008

Sumber : http://news.palcomtech.com/2012/05/tutorial-1-mengenal-dasar-sql-server-2008/
 
 Sasaran:
  1. Dapat mengubah properties SQL Server 2008 agar bisa diakses banyak Client
  2. Dapat membuat Database dan Tabel di SQL Server 2008
  3. Dapat membuat User login ke SQL Server 2008
PENDAHULUAN
Pembuatan aplikasi database menggunakan Delphi 2007 dan SQL Server 2008 dapat dibedakan 2(dua) jenis dari sisi pemakainya, yaitu:
  1. Aplikasi Stand Alone, artinya aplikasi yang akan dibuat hanya akan dipakai/digunakan oleh satu komputer.
  2. Aplikasi Client-Server, artinya aplikasi yang akan dibuat akan digunakan oleh banyak client didalam jaringan.
Pemilihan jenis aplikasi yang akan dibuat akan berpengaruh terhadap Setting SQL Server 2008 dan Folder tempat penyimpanan Database. Pada studi kasus yang akan dibuat “Sistem Informasi Mini Market” akan dibuat aplikasi jenis Client-Server agar aplikasi yang dibuat bisa digunakan oleh banyak client (Operator Kasir, bagian persediaan, admin aplikasi dan pemilik).
SQL Server 2008 yang sudah terinstall hanya jalan di local server, artinya database dan tabel yang ada hanya bisa diakses dari komputer server tetapi tidak bisa diakses dari komputer lain (client) dalam jaringan. Agar bisa diakses oleh Client maka SQL Server 2008 yang sudah terinstall ada beberapa Properties SQL Server 2008 yang harus di setting ulang.
MENGATUR PROPERTIES SQL SERVER 2008
Sebelum mengatur properties SQL Server 2008 buat folder terlebih dahulu untuk penyimpanan database dan tempat membackup database (buat folder  D:\DatabaseMiniMarket dan D:\BackUpDatabase)

Langkah 1

Login ke SQL Server Athentication Windows
Untuk bisa mengatur properties server, login terlebih dahulu ke Server Authentication windows, dengan cara :
  1. Buka Microsoft SQL Server 2008
  2. Pilih SQL Server Managemen Studio
  3. Isi Dialog Login
  • Server type : Pilih Database Engine
  • Server name : Tuliskan Nama Server, atau Pilih Browse dikotak Server name, klik Folder Database Engine, klik Nama Server
Authentication  : Windows Authentication

Klik Tombol Connect.

Langkah 2

Merubah Properties Server
Langkah-langkah mengatur properties SQL Server 2008, adalah :
  1. Klik Kanan di Nama Server pilih Properties
  2. Klik Folder Security, dikotak Select Page
  • Klik radiobutton SQL Server and Windows Authentication
  • Klik radiobutton Failed Only
        3. Klik Folder Database Setting dikotak Select Page
Pada Kotak data, tuliskan tempat database akan disimpan atau klik tombol Browse dan pilih dimana database akan disimpan. (d:\DatabaseMiniMarket)
Pada Kotak Log, tuliskan tempat log database akan disimpan atau klik tombol Browse dan pilih dimana Log database akan disimpan. (d:\DatabaseMiniMarket)

Langkah 3

Membuat  User login
Tujuan pembuatan user login adalah menentukan orang-orang yang berhak masuk ke SQL Server 2008 dan pengaturan hak akses user login. Adapun langkah-langkah membuat user login adalah sebagai berikut :
  1. Klik Folder Security
  2. Klik SubFolder Login
  3. Klik Kanan Pilih New Login

  • Klik Folder General pada kotak Select page.
Pada Kotak Login name tuliskan user yang akan dibuat misal adminserver. Klik radiobutton SQL Server authentication. Kemudian Tuliskan password pada kotak passwor misal 123. Lalu luliskan Confirm Password yaitu 123. Buang tanda Check pada Enforce password expiration.
  • Klik Folder Server Role pada Kotal Select Page.

Pilih sysadmin, artinya user sebagai admin server.
  •  Klik Folder User Mapping pada kotak Select Page

  • Pilih salah satu database yang ada misal master
  • Pilih dbowner pada kotak dibawahnya
Dan ikuti langkah-langkahnya dibawah ini :
  1. Klik Tombol OK
  2. Klik Kanan Mouse Pada Nama Server
  3. Pilih ReStart, agar semua perubahan Propert.ies akan dijalankan
  4. Keluar dari SQL Server (File-Exit)

Langkah 4

Login SQL Server Authentication
1. Buka SQL Server 2008
2. Isi Dialog Login,
  • Server type, Pilih Database Engine
  • Server name, Tuliskan Nama Server, atau
  • Pilih Browse dikotak Server name
  • Klik Folder Database Engine
  • Klik Nama Server
Authentication: SQL Server Authentication
  • Login, isi dengan username yang telah dibuat (adminserver)
  • Password, masukan password untuk username (123)
3. Klik Tombol Connect, Jika Perubahan properties dan pembuatan user berhasil maka connect akan berhasil

Langkah 5

Membuat  Database
Sebelum database dan tabel dibuat sebaiknya anda melakukan pengecekan terlebih dahulu option designer database, dengan cara :
Klik Menu Tools – Pilih Options.
  1. Pada Kotak Options klik Designers
  2. Pada table options, buang tanda check pada ‘Prevent saving changes that required tabel re-creation’  karena jika tanda check belum dibuang maka tabel yang dibuat tidak bisa diedit/modifikasi.
  3. Klik Tombol OK.
Langkah-langkah membuat database adalah sebagai berikut,
  1. Klik Folder Database
  2. Klik Kanan Mouse
  3. Pilih New Database


  • Pada Kotak database name Tuliskan: MiniMarket
  • Pada Kotak owner tuliskan : adminserver
Klik Tombol OK.

Langkah 6

Menambahkan Tabel Ke Database
Untuk menambahkan tabel kedalam database yang dibuat adalah sebagai berikut,
  1. Klik Folder Database
  2. Klik Subfolder MiniMarket
  3. Klik Subfolder Table
  4. Klik Kanan Mouse
  5. Pilih New Table

  • Pada kotak Column Name, tuliskan Field-Field tabel yang akan dibuat
  • Pada kotak Data Type, tuliskan/pilih tipe data dan ukuran field
  • Jika table mempunyai Primary Key, klik di Column Name yang akan dijadikan Primary Key, Klik Kanan Mouse pilih Set Primary Key
  • Simpan Table, dengan cara mengklik icon Disket dibagian atas dan tuliskan nama tabel ‘Person’
Untuk menambahkan tabel lainnya ulangi langkah a s/d e. Buat Semua tabel yang akan digunakan pada Sistem Informasi MiniMarket (11 Tabel) yang ada dibagian akhir tutorial 1 ini.

Langkah 7

Membackup Database
Membackup database bertujuan membuat cadangan database untuk digunakan  pada saat dibutuhkan.
Langkah-langkah untuk membackup database pada SQL Server adalah sbb :
  •  Klik Folder Server Object
  •  Klik SubFolder Backup Device
  •  Klik Kanan Mouse
  •  Pilih Backup a Database

  • Remove Folder backup dikotak dibawah Back up to.
  • Pada Kotak database pilih database yang akan di Backup (Pilih MiniMarket)
  • Klik Tombol Add.

Pada Kotak File name, Tuliskan Folder tempat Data akan dibackup beserta nama file backupnya, contoh:
D:\BackUpDatabase\MiniMarket_Backup
Artinya folder tempat backup adalah D:\BackUpDatabase, sedangkan nama file Backup adalah MiniMarket_Bakcup
  • Klik Tombol OK dan OK

Langkah 8

Merestore Database
Langkah-langkah Restore Database adalah sbb:
  • Klik Folder Database
  • Klik Kanan Mouse
  •  Pilih Restore Database
 

  •  Pada kotak to Database pilih MiniMarket
  •  Klik RadioButton From Device
  •  Klik tombol Browse disamping kota From Device

  •  Klik Tombol Add.

  •  Dikotak Select the file, pilih folder tempat database hasil backup (D:\BackUpDatabase)
  •  Dikotak File name, tuliskan nama file backup yang akan di restore tuliskan MiniMarket_BackKUp
  •  Klik Tombol OK dan OK
  •  Klik  CheckBox  Restore,
  •  Pilih Folder Options

  •  Klik CheckBox Overwrite the existing database
  •  Klik Tombol OK

Selasa, 25 Desember 2012

Enable Remote Connection on SQL Server 2008 Express

Sumber : http://www.linglom.com/2009/03/28/enable-remote-connection-on-sql-server-2008-express/

Introduction

Last time, I wrote an article show how to enable remote connection on SQL Server 2005 Express. Now SQL Server 2008 Express is released for a while, it doesn’t allow remote connection on default installation as on SQL Server 2005 Express. So you have to enable it manually.


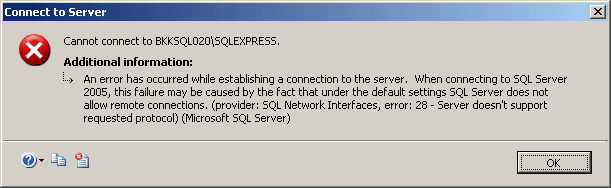
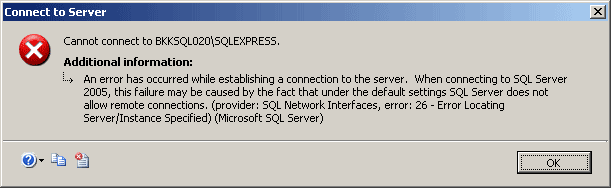
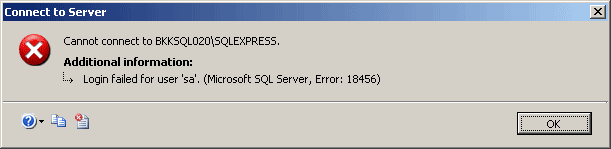
If you’re trying to connect to SQL Server 2008 Express remotely without enable remote connection first, you may see these error messages:
  • “Cannot connect to SQL-Server-Instance-Name
    An error has occurred while establishing a connection to the server. When connecting to SQL Server 2005, this failure may be caused by the fact that under the default settings SQL Server does not allow remote connections. (provider: SQL Network Interfaces, error: 28 – Server doesn’t support requested protocol) (Microsoft SQL Server)”

    Server doesn't support requested protocol
  • “Cannot connect to SQL-Server-Instance-Name
    An error has occurred while establishing a connection to the server. When connecting to SQL Server 2005, this failure may be caused by the fact that under the default settings SQL Server does not allow remote connections. (provider: SQL Network Interfaces, error: 26 – Error Locating Server/Instance Specified) (Microsoft SQL Server)”

    Error Locating Server/Instance Specified
  • “Cannot connect to SQL-Server-Instance-Name
    Login failed for user ‘username‘. (Microsoft SQL Server, Error: 18456)”

    Login failed for user 'sa'
To enable remote connection on SQL Server 2008 Express, see the step below:
  1. Start SQL Server Browser service if it’s not started yet. SQL Server Browser listens for incoming requests for Microsoft SQL Server resources and provides information about SQL Server instances installed on the computer.
  2. Enable TCP/IP protocol for SQL Server 2008 Express to accept remote connection.
  3. (Optional) Change Server Authentication to SQL Server and Windows Authentication. By default, SQL Server 2008 Express allows only Windows Authentication mode so you can connect to the SQL Server with current user log-on credential. If you want to specify user for connect to the SQL Server, you have to change Server Authentication to SQL Server and Windows Authentication.
Note: In SQL Server 2008 Express, there isn’t SQL Server Surface Area Configuration so you have to configure from SQL Server Configuration Manager instead.

Step-by-step

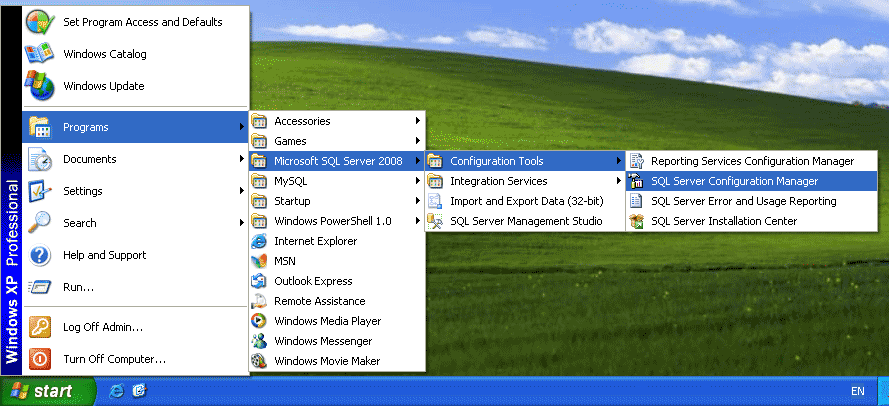
  1. Open SQL Server Configuration Manager. Click Start -> Programs -> Microsoft SQL Server 2008 -> Configuration Tools -> SQL Server Configuration Manager.
    SQL Server Configuration Manager
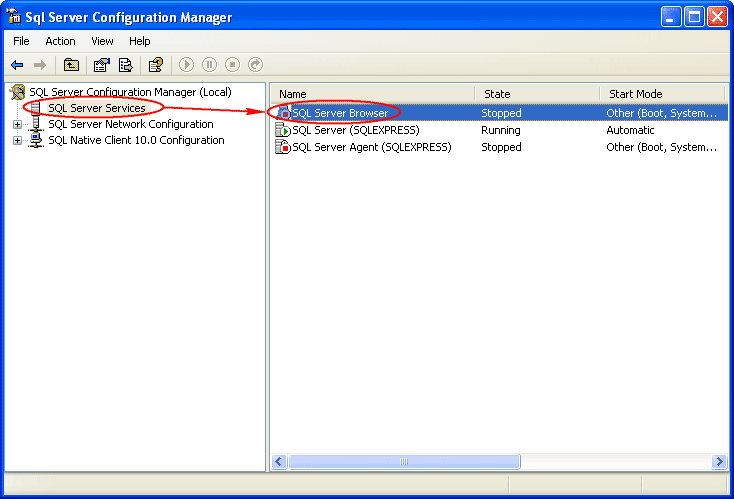
  2. On SQL Server Configuration Manager, select SQL Server Services on the left window. If the state on SQL Server Browser is not running, you have to configure and start the service. Otherwise, you can skip to step 6.
    SQL Server Browser Service
  3. Double-click on SQL Server Browser, the Properties window will show up. Set the account for start SQL Server Browser Service. In this example, I set to Local Service account.
    Set Startup Account
  4. On SQL Server Browser Properties, move to Service tab and change Start Mode to Automatic. Therefore, the service will be start automatically when the computer starts. Click OK to apply changes.
    Set Start Mode to Automatic
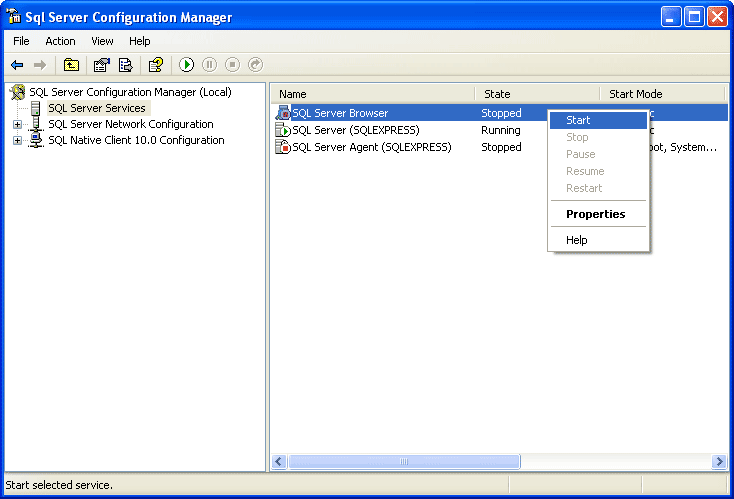
  5. Back to SQL Server Configuration Manager, right-click on SQL Server Bowser on the right window and select Start to start the service.
    Start SQL Server Browser Service
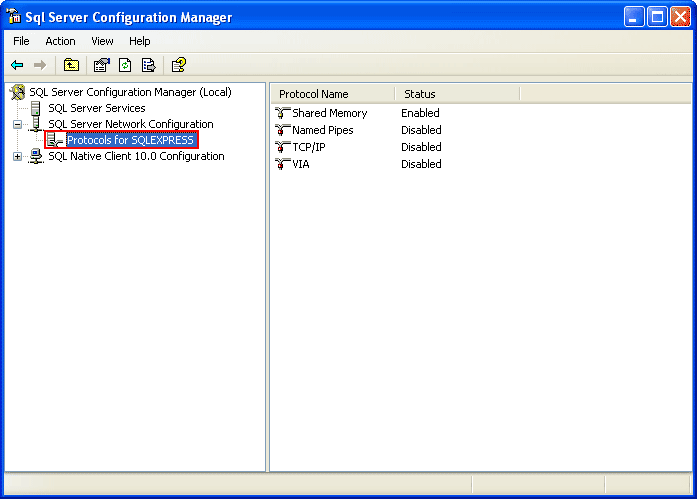
  6. On the left window, expand SQL Server Network Configuration -> Protocols for SQLEXPRESS. You see that TCP/IP protocol status is disabled.
    Protocols for SQL EXPRESS
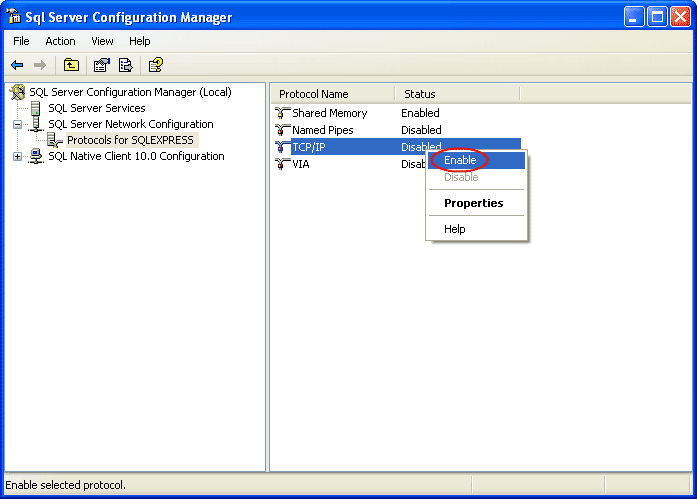
  7. Right-click on TCP/IP and select Enable to enable the protocol.
    Enable TCP/IP protocol
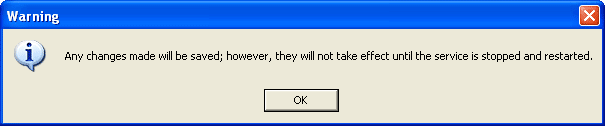
  8. There is a pop-up shown up that you have to restart the SQL Service to apply changes.
    Need to Restart SQL Server Service
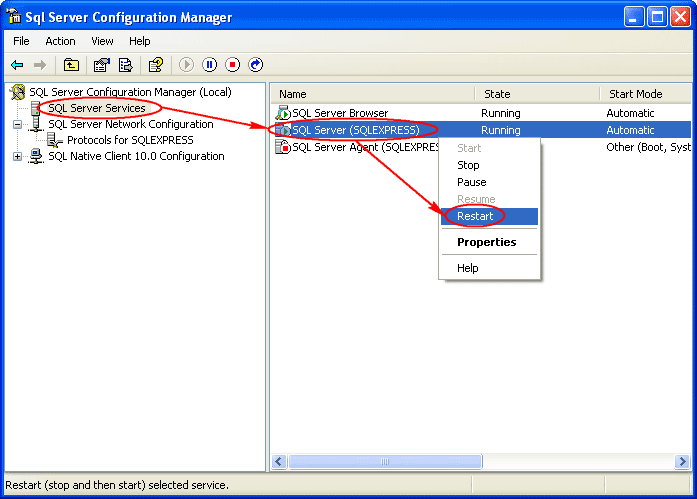
  9. On the left window, select SQL Server Services. Select SQL Server (SQLEXPRESS) on the right window -> click Restart. The SQL Server service will be restarted.
    Restart SQL Server Service
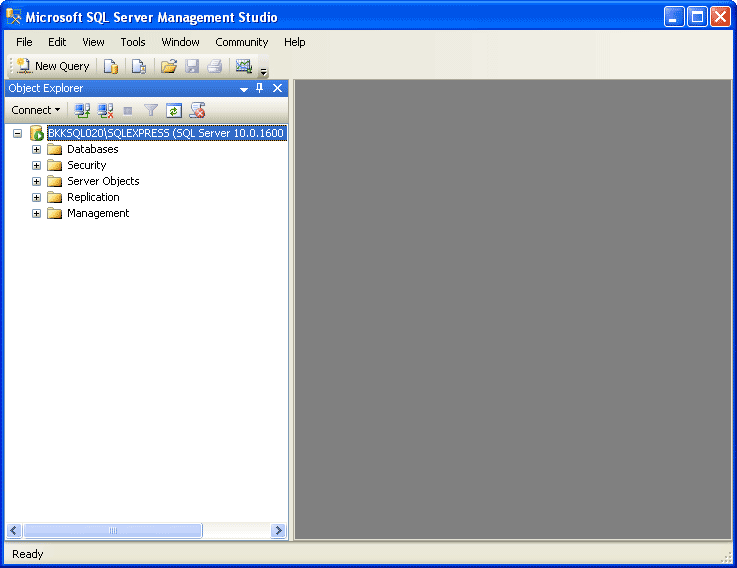
  10. Open Microsoft SQL Server Management Studio and connect to the SQL Server 2008 Express.
    Open Microsoft SQL Server Management Studio
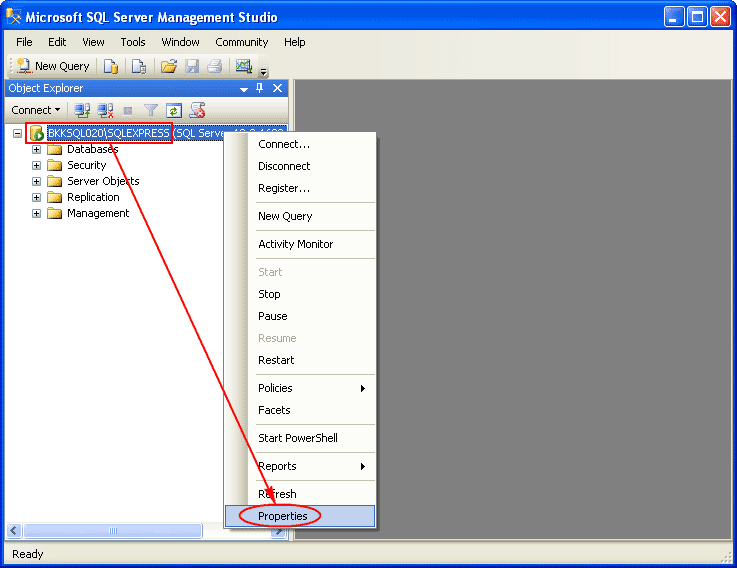
  11. Right-click on the SQL Server Instance and select Properties.
    Open Server Properties
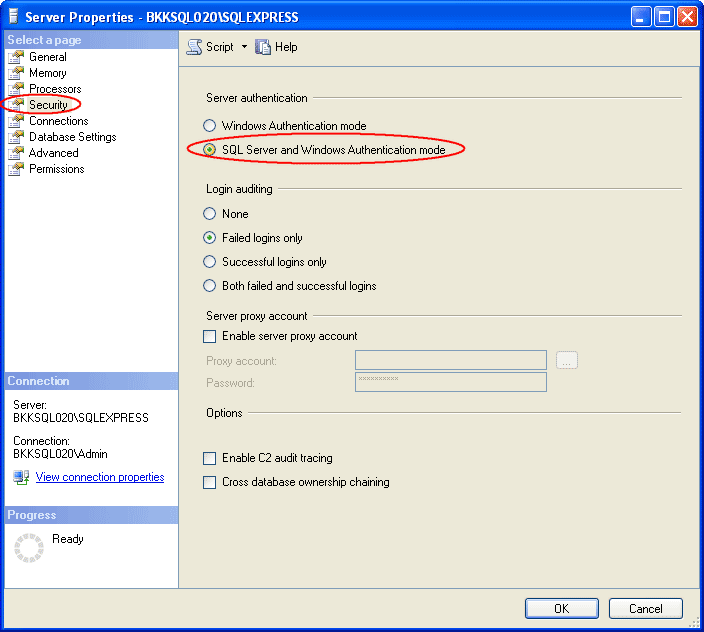
  12. On Server Properties, select Security on the left window. Then, select SQL Server and Windows Authentication mode.
    Change Authentication to SQL Server and Windows Authentication
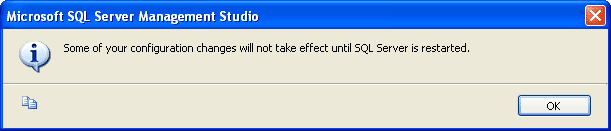
  13. Again, there is a pop-up shown up that you have to restart the SQL Service to apply changes.
    Need to Restart SQL Server Service
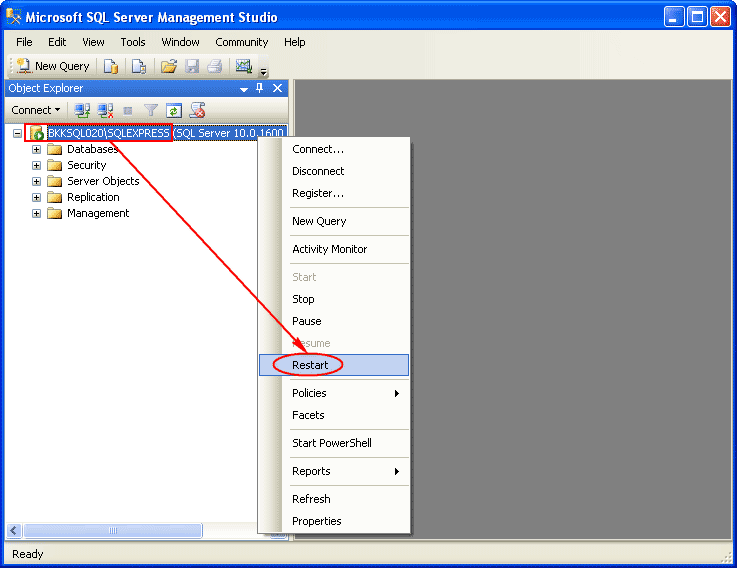
  14. Right-click on the SQL Server Instance and select Restart.
    Restart SQL Server Service
  15. That’s it. Now you should be able to connect to the SQL Server 2008 Express remotely.

Jumat, 05 Oktober 2012

PHP RSS Executing Microsoft SQL Server Stored Procedure from PHP on Linux Read more at http://www.devarticles.com/c/a/PHP/Executing-Microsoft-SQL-Server-Stored-Procedure-from-PHP-on-Linux

Sumber : http://www.devarticles.com/c/a/PHP/Executing-Microsoft-SQL-Server-Stored-Procedure-from-PHP-on-Linux/7/

On my Windows box (home2k), I use Microsoft SQL Server query analyzer to create the following stored procedure on pubs database (I will use this stored procedure on Sybase SQL Server with pubs2 database in my next article):
CREATE PROC sp_GetBooksByPrice
@minPrice money,
@maxPrice money,
@lowestPricedBook varchar(100) OUTPUT,
@highestPricedBook varchar(100) OUTPUT
AS
DECLARE @realminPrice money,  @realmaxPrice money, @totalBooks int
SELECT @realminPrice = min(price) FROM titles WHERE price >=@minPrice
SELECT @realmaxPrice = max(price) FROM titles WHERE price <
=@maxPrice
SELECT @lowestPricedBook =title FROM titles WHERE price = @realminPrice
SELECT @highestPricedBook =title  FROM titles WHERE price = @realmaxPrice
SELECT @totalBooks = COUNT(title)  FROM titles WHERE price >= @minPrice AND price <= @maxPrice
RETURN  @totalBooks
GO

On the Red Hat side, use an editor to create the following file called sp_test.php:
$myServer = "home2k";
$myUser = "sa";
$myPass = "";
$myDB = "pubs";

$s = mssql_connect($myServer, $myUser, $myPass)
or die("Couldn't connect to SQL Server on $myServer");

mssql_select_db($myDB, $s)
or die("Couldn't open database $myDB");

$proc = mssql_init("sp_GetBooksByPrice", $s);
$minPrice = 2.00;
$maxPrice = 20.00;
$lowestPricedBook = "";
$highestPricedBook = "";
$numBooks = 0;

// Bind the parameters
mssql_bind($proc, "@minPrice", $minPrice, SQLFLT8);
mssql_bind($proc, "@maxPrice", $maxPrice, SQLFLT8);
mssql_bind($proc, "@lowestPricedBook", $lowestPricedBook, SQLVARCHAR, TRUE, FALSE,100);
mssql_bind($proc, "@highestPricedBook", $highestPricedBook, SQLVARCHAR, TRUE, FALSE,100);

// Bind the return value
mssql_bind($proc, "RETVAL", $numBooks, SQLINT2);
mssql_execute($proc);
mssql_free_statement ($proc);
mssql_close($s);

echo "

There were $numBooks Books returned.

";
echo "The lowest price book was: $lowestPricedBook.
";
echo "The highest price book was: $highestPricedBook.";
?>

Save the file in /usr/local/Apache2/htdocs, open your browser, and input http://localhost/sp_test.php in address bar. It is useful when you debug your PHP code with MS SQL Server.
Read more at http://www.devarticles.com/c/a/PHP/Executing-Microsoft-SQL-Server-Stored-Procedure-from-PHP-on-Linux/7/#GMapUYYU2SbkICRo.99

Cara Lain Ada di : http://www.daniweb.com/web-development/php/threads/112159/php-mssql-stored-procedure-with-parameters-in-and-out

gave up trying to do the output code version of the Stored Procedure call, instead I changed my Stored Procedure to return a single row which would contain the information I needed.
Then, to call the MS SQL Server 2000 Stored Procedure from PHP, I did the following:
  
// Connect to SQL Server and check for errors
  1. $conn = mssql_connect($db_host,$db_user,$db_password);
  2. if ($conn===false)
  3. {
  4. echo 'Cannot connect to SQL Server Database. Please try again later. ';
  5. exit;
  6. }
  7. if (mssql_select_db("MyDatabase",$conn) === false)
  8. {
  9. echo 'Cannot connect to MyDatabase. Please try again later. ';
  10. exit;
  11. }
  12. $proc = mssql_init('MyStoredProcedure',$conn);
  13. mssql_bind($proc,'@ParameterOne',$ParameterOne,SQLVARCHAR);
  14. mssql_bind($proc,'@ParameterTwo',$ParameterTwo,SQLVARCHAR);
  15. mssql_bind($proc,'@ParameterThree',$ParameterThree,SQLVARCHAR);
  16. if ($result = mssql_execute($proc))
  17. {
  18. if ($row = mssql_fetch_row($result))
  19. {
  20. // now you can deal with the $row array to check out your results
  21. }
  22. }
 

Rabu, 12 September 2012

Koneksi PHP dan SQL Server 2000 Bagian II

Sumber : http://lemahhegar.blogspot.com/2010/07/mengakses-microsoft-sql-server-2000_28.html

D. Membuat Koneksi ke MS SQL Server 2000 dengan PHP
Bagian ini akan membahas mengenai penulisan script untuk mendapatkan acces ke MS SQL server dengan metode ODBC. Fungsi yang digunakan untuk mengakses MS SQL server dengan metode tersebut adalah odbc_connect(dsn, nama user, password), script ini memerintahkan untuk melakukan koneksi terhadap sumber data yang telah kita buat DSN systemnya (nama sumber data yang dapat diakses oleh siapa saja yang memiliki akses terhadap mesin), dengan user name dan password yang telah disimpan dalam database MS SQL Server, mengenai DSN dan bagaimana membuat System DSN telah dibahas dengan cukup panjang pada bagian sebelumnya, sedangkan mengenai cara membuat user name dan password pada MS SQL server 2000 akan dijelaskan secara ringkas pada bagian ini, langkah yang dilakukan adalah sebagai berikut:

Kamis, 07 Juni 2012

Tips Optimasi Query SQL Server

Optimasi dapat berarti suatu cara untuk memperoleh kinerja maksimum. Maka Optimasi Query SQL Server berarti suatu cara atau tips untuk memperoleh kinerja maksimum dari Database SQL Server saat mengeksekusi perintah Query yang kita berikan.

Setelah berkelana menjelajahi puluhan tutorial di Internet yang saya dapatkan, saya coba share beberapa trik untuk optimasi Database SQL Server kita, antara lain :

1. Menentukan Tipe Data yang Tepat.
Hal ini sebenarnya gampang-gampang susah, perlu ketelitian dalam menganalisa tipe dari data-data yang hendak kita kelola. Sebagai contoh, Kita harus mengetahui kapan harus menggunakan tipe data char atau varchar. Keduanya sama-sama tipe karakter, bedanya char ukuran penyimpanannya tetap (fixed), sedangkan varchar ukuran penyimpanannya sesuai dengan panjang karakter data.

2. Hindari Allow Null
Kurangi penggunaan Allow Null, sebagai gantinya berikan nilai default bila field kosong. Nilainull mengonsumsi byte tambahan sehingga menambah beban saat akses query.

3. Hindari SELECT *
Perintah SELECT sangat umum digunakan, perintah SELECT dengan (*) akan mengakses seluruh field di suatu tabel. Bila tabel anda punya banyak field dan anda hanya memerlukan sebagian fieldnya saja, ada baiknya anda menentukan field yang hendak anda proses daripada menggunakan tanda (*).

4. Batasi ORDER BY
Pengurutan akan menambah konsekuensi menambah beban query karena akan menambah 1 proses yaitu sorting. Karena itu gunakan perintah ORDER BY hanya jika anda memerlukannya. Jika memungkinkan lakukan proses Pengurutan / Sorting pada aplikasi, bukan di Query.

5. Gunakan JOIN daripada Subquery
Daripada anda menumpuk beberapa Query sekaligus yang saling berhubungan, lebih baik anda menggunakan JOIN untuk menghasilkan performa yang lebih cepat.

6. Batasi Record yang dipanggil
Perhatikan bila table anda memiliki ratusan atau ribuan data, jangan memanggil seluruh data sekaligus. Disarankan anda melakukan Paging dengan membatasi Record yang keluar dengan menggunakan perintah TOP didalam perintah SELECT. Contoh : SELECT TOP 100... (sama dengan perintah LIMIT pada Mysql)

7. Link Gambar di Database
Ada pepatah mengatakan sebuah gambar bermakna sejuta kata namun tidak berarti anda harus menyimpan gambar tersebut di database, akan lebih optimal bila anda menyimpan path / lokasi dan nama file gambarnya saja.

Pasti masih banyak cara lain yang tidak mungkin dibahas semuanya disini. Mungkin anda juga tidak terlalu melihat perbedaan yang signifikan jika anda mengabaikan tips-tips diatas terlebih jika spesifikasi komputer / server anda cukup canggih untuk kinerja eksekusi program yang cepat. Namun anda disarankan untuk menekan penggunaan memory untuk optimasi kinerja Database terlebih bila anda bekerja dengan aplikasi yang besar.


Sumber : http://aplikasivbnet.blogspot.com/2011_06_01_archive.html

Rabu, 02 Mei 2012

Mengenal SQL Server

Sumber : Sumber : http://sisawaktu.wordpress.com/2007/11/05/mengenal-sql-server/
Tulisan ini sebenarnya lebih bersifat dokumentasi pribadi, dari hasil trial and error (and error melulu) selama saya terjerumus ke pusaran sql server. Kalau Anda masih nekat mau baca juga, mari kita sepakati beberapa hal. Pertama, semua yang ditulis di sini dalam lingkungan sql server 2000. Memang sql server 2005 sudah setahun lalu beredar, tapi saya belum pernah membukanya. Jadi mungkin ada beberapa hal yang tidak kompatibel jika Anda jalankan di sql server 2005.
Kedua, saya menganggap Anda memiliki pemahaman komputer di level intermediate. Maksud saya, Anda sudah tahu bedanya database dengan tabel, dan bedanya fisik database dengan logic database. Beberapa istilah tidak saya terjemahkan, semata-mata karena saya tidak tahu bagaimana menterjemahkannya.
Ketiga, trik yang saya lakukan di sini, tidak sepenuhnya saya ketahui dampaknya terhadap aplikasi yang Anda tulis. Jadi berlakulah aturan tukang parkir: hilang/rusak tanggung sendiri.
Setuju tidak setuju, silakan teruskan membaca.

Jumat, 27 April 2012

How to: Save Dataset Changes to a Database


Visual Studio 2010

Sumber : http://msdn.microsoft.com/en-us/library/xzb1zw3x.aspx
After the data in your dataset has been modified and validated, you probably want to send the updated data back to a database. In order to send the modified data to a database, you call the Update method of a TableAdapter or data adapter. The adapter's Update method updates a single data table and executes the correct command (INSERT, UPDATE, or DELETE) based on the RowState of each data row in the table.
When saving data in related tables, Visual Studio provides a TableAdapterManager component that assists in performing saves in the proper order based on the foreign-key constraints defined in the database. For more information, see Hierarchical Update Overview.
NoteNote
Because attempting to update a data source with the contents of a dataset can result in errors, you should place the code that calls the adapter's Update method inside of a try/catch block.
The exact procedure to update a data source can vary depending on your business needs, but your application should include the following steps:

How to compare two tables for differences?


Execute the following Microsoft SQL Server 2008 T-SQL scripts in Query Editor to demonstrate the comparison of two tables for differences in rows and/or columns (cells).
------------
-- SQL SERVER COMPARE 2 TABLES FOR ROW & COLUMN DIFFERENCES
------------
-- TEMPLATE - SQL Server T-SQL compare two tables
SELECT Label='Found IN Table1, NOT IN Table2',* FROM 
(SELECT * FROM Table1
EXCEPT
SELECT * FROM Table2) x
UNION ALL
SELECT Label='Found IN Table2, NOT IN Table1',* FROM
(SELECT * FROM Table2
EXCEPT
SELECT * FROM Table1) y
GO
------------

DateTime.ToString() Patterns


All the patterns:

0MM/dd/yyyy08/22/2006
1dddd, dd MMMM yyyyTuesday, 22 August 2006
2dddd, dd MMMM yyyyHH:mm Tuesday, 22 August 2006 06:30
3dddd, dd MMMM yyyyhh:mm tt Tuesday, 22 August 2006 06:30 AM
4dddd, dd MMMM yyyyH:mm Tuesday, 22 August 2006 6:30
5dddd, dd MMMM yyyyh:mm tt Tuesday, 22 August 2006 6:30 AM
6dddd, dd MMMM yyyy HH:mm:ssTuesday, 22 August 2006 06:30:07
7MM/dd/yyyy HH:mm08/22/2006 06:30
8MM/dd/yyyy hh:mm tt08/22/2006 06:30 AM
9MM/dd/yyyy H:mm08/22/2006 6:30
10MM/dd/yyyy h:mm tt08/22/2006 6:30 AM
11MM/dd/yyyy HH:mm:ss08/22/2006 06:30:07
12MMMM ddAugust 22
13MMMM ddAugust 22
14yyyy'-'MM'-'dd'T'HH':'mm':'ss.fffffffK2006-08-22T06:30:07.7199222-04:00
15yyyy'-'MM'-'dd'T'HH':'mm':'ss.fffffffK2006-08-22T06:30:07.7199222-04:00
16ddd, dd MMM yyyy HH':'mm':'ss 'GMT'Tue, 22 Aug 2006 06:30:07 GMT
17ddd, dd MMM yyyy HH':'mm':'ss 'GMT'Tue, 22 Aug 2006 06:30:07 GMT
18yyyy'-'MM'-'dd'T'HH':'mm':'ss2006-08-22T06:30:07
19HH:mm06:30
20hh:mm tt06:30 AM
21H:mm6:30
22h:mm tt6:30 AM
23HH:mm:ss06:30:07
24yyyy'-'MM'-'dd HH':'mm':'ss'Z'2006-08-22 06:30:07Z
25dddd, dd MMMM yyyy HH:mm:ssTuesday, 22 August 2006 06:30:07
26yyyy MMMM2006 August
27yyyy MMMM2006 August

The patterns for DateTime.ToString ( 'd' ) :

0MM/dd/yyyy08/22/2006

Use stored procedure to insert data VB.NET ( Windows forms )


SAVE DATA ON SQL SERVER THROUGH CALLING SP ( VB.NET FORMS ) 


Private Sub OK_Click(ByVal sender As System.Object, ByVal e As System.EventArgs) Handles OK.Click
Dim sqlSP As String = "stp_InsertUser"
Dim strConnection As String = "Data Source=.;Initial Catalog=DATAbaseName;User ID=sa;Password='111';"
Dim conn As New SqlConnection(strConnection)
conn.Open()
Dim cmd As New SqlCommand(sqlSP, conn)
cmd.CommandType = CommandType.StoredProcedure
cmd.Parameters.Add(New SqlParameter("@UserLogin", SqlDbType.VarChar, 100, ParameterDirection.Input, _
False, 0, 0, "", DataRowVersion.Proposed, UsernameTextBox.Text))
cmd.Parameters.Add(New SqlParameter("@UserPwd", SqlDbType.VarChar, 100, ParameterDirection.Input, _
False, 0, 0, "", DataRowVersion.Proposed, PasswordTextBox.Text))
Try
cmd.ExecuteNonQuery()
MsgBox("User Added successfully ", MsgBoxStyle.OkOnly)
Catch ex As Exception
MsgBox("Please Enter UserName.", MsgBoxStyle.Critical)
End Try
cmd.Connection.Close()
End Sub

Selasa, 24 April 2012

Transaksi di VB.Net Lanjutan


PRA KATA...
Pada saat membuat program terutama untuk aplikasi database, seringkali kita dihadapkan pada model penyimpanan master/detail atau header/detail. contoh nya pada kasus Order pembelian, penerimaan barang dan masih banyak lagi. tekhnik penyimpanannya sebenarnya bisa dilakukan dengan menyimpan headernya terlebih dahulu, baru kemudian kita tambahkan detailnya satu per satu, akan tetapi ada kalanya kita dihadapkan pada situasi bahwa data yang di masukan harus sukses tersimpan semuanya.. jika ada kesalahan.. entah yg disebabkan terputusnya koneksi secara tiba2 atau hal lainnya, maka data tersebut tidak boleh tersimpan hanya sebagian saja. Nah untuk situasi semacam ini memanfaatkan fungsi transaction pada SQLconnection menjadi perlu. untuk tujuan tersebutlah tulisan ini dibuat... ini hasil explorasi ku aja.. kalo ada yang lebih baik lagi tekhniknya boleh dong di sharing.. :)

STARTING..
Pada kasus ini saya menggunakan database SQLServer dg nama database test dan dua buah tabelTrsH sebagai tabel headernya dg field sbb (NoTrs Varchar(64), Desk Varchar(80) ) dan tabel TrsDsebagai tabel detailnya dg Field sbb (ID Smallint, NoTrs Varchar(64), Qty Smallint). Oleh karenanya jika ingin mencoba maka harus membuat database dan tabel-tabel tersebut.